We Have Oxide at Home - Part 1 - Oxide On Proxmox
0xide Computer opensource almost all their code for their self hosted cloud stack. My attempt to virtualise the whole stack to explore its capabilities on Proxmox

Background and goals
I have been doing a lot of reading about oxide.computer lately and wanted to experiment with the platform. At the time of writing there wasn't a viable path for me to get access to a Oxide deployment and the console preview is the full UI but relying on a simulated API backend.
I spent a fair amount of time experimenting with a number of configurations and deployment options. I managed to get most of the components running in docker. This was ok but i wanted to test a full deployment up and running to properly test some of the integrations such as Terraform and OpenTel
Oxide provide guides for different deployment approaches
- how-to-run-simulated.adoc - Simulated Oxide control plane deployment on Linux or Mac
- how-to-run.adoc - Full deployment
The goal is a full full oxide stack running non-simulated mode on on Proxmox host, as this was the only system i had available with sufficient resources to run this stack.
Technical
When we run a full setup it creates roughly 30 illumos zones including 5 CockroachDB nodes, 3 Nexus instances, Crucible storage, DNS, and all supporting services on a single host or “sled”.
According to Oxide, we wont be able to start VMs on this host as nested virtualisation ins supported. Only the Propolis/VM instances won’t work, everything else should work
VM Requirements
I picked the
- CPU: I have been running fine with 2 cpu’s each with 2 cores
- RAM: 48 GB minimum is where i laned (8 GB caused kernel panic,
pageout\_deadman, total memory exhaustion) but i believe you could get away with 32gb, haven't tested in depth - Disk: 256 GB minimum (128 GB filled rpool to 91% and caused unrecoverable ZFS I/O failures) you need more if you dont complete the optional steps section
Network Layout
I set aside a contiguous block of IPs to make things easier later, this is the ranges i used
| Range | Purpose |
| 192.168.100.209 | VM IP (DHCP on e1000g0) |
| 192.168.100.70-79 | Internal services pool (External DNS, Nexus external API |
| 192.168.100.80 | SoftNPU infra address |
| 192.168.100.81-90 | Instance IP pool |
Access (Post Install)
- Console: http://192.168.100.72/login/recovery/local (URL matters!)
- API: http://192.168.100.72/v1/ping
- Login: username
recovery, passwordoxide - DNS:
dig recovery.sys.oxide.test @192.168.100.70 +short
Install Helios
Oxide Helios is a custom version Liiumos which is a continuation of the OpenSolaris project.
You can grab ISO from https://pkg.oxide.computer/install/latest/
I used the vga variant to keep it simple, but even with this version if you want serial terminal add one to your VM and . Serial terminal may be easier as there are a few commands you have to run. If you are using Proxmox you can learn how it works here.
Boot the ISO
From the “Installing on a physical machine using the ISO” guide. Boot into the ISO and you end up at a prompt
Booting from DVD/CD...
CD Loader 1.2

Building the boot loader arguments
Looking up /BOOT/LOADER... File not found
Looking up /boot/loader... Found
Relocating the loader and the BTX
Starting the BTX loader

Configuring devices.
Hostname: unknown


 -- Welcome to Oxide Helios! -------------------------------------------------

    This bootable ISO allows you to install Helios on a traditional
    install-to-disk system; e.g., a desktop PC or a BIOS/EFI-boot
    server.

    To install, use "diskinfo" to locate the disk you wish to install
    to, and then use "install-helios" to format it and install the
    operating system.

    More information is available in the "Installing on a physical
    machine using the ISO" section of the README at:

        https://github.com/oxidecomputer/helios-engvm

 -----------------------------------------------------------------------------

# diskinfo
TYPE    DISK                    VID      PID              SIZE          RMV SSD
SATA    c2t0d0                  QEMU     HARDDISK          256.00 GiB   no  no
# install-helios helios01 c2t0d0
Login with root and bank password and setup the network interfaces
root@helios01:~# dladm show-ether
LINK            PTYPE    STATE    AUTO  SPEED-DUPLEX                    PAUSE
e1000g0         current  unknown  yes   0G-h                            bi
root@helios01:~# dladm show-phys -m
LINK         SLOT     ADDRESS            INUSE CLIENT
e1000g0      primary  bc:24:11:f4:ef:51  no   --
root@helios01:~# ipadm create-if e1000g0
root@helios01:~# ipadm create-addr -T dhcp -h $(hostname) e1000g0/dhcp
Mar  4 00:38:37 helios01 in.routed[1045]: route 0.0.0.0/8 --> 0.0.0.0 nexthop is not directly connected
root@helios01:~# svcadm restart network/service
root@helios01:~# ipadm show-addr
ADDROBJ           TYPE     STATE        ADDR
lo0/v4            static   ok           127.0.0.1/8
e1000g0/dhcp      dhcp     ok           192.168.100.209/24
lo0/v6            static   ok           ::1/128
Create your user account
On your workstation, ensure you have a public key in ~/.ssh/. The oxide script works on the assumption its present.
ls ~/.ssh/id_*.pub >/dev/null 2>&1 || ssh-keygen -t ed25519 -N "" -f ~/.ssh/id_ed25519
for key in ~/.ssh/id_*.pub; do
    grep -qF "$(cat "$key")" ~/.ssh/authorized_keys 2>/dev/null || cat "$key" >> ~/.ssh/authorized_keys
done
Oxide then has handy little script that sets up some user config + your SSH keys. it uses netcat to do this, so don't do this on a network you don't 100% control
# On your workstation:
git clone https://github.com/oxidecomputer/helios-engvm.git
cd helios-engvm
./aws/gen_userdata.sh | nc <HELIOS_IP> 1701
Oh the HeliosVM
# Nn the Helios VM
nc -l 1701 </dev/null | bash -x
You should then be able to SSH to the helios VM
Configure swap
Example commands for 8gb, adjust for your enviroment
pfexec zfs create -V 8G rpool/swap
echo '/dev/zvol/dsk/rpool/swap - - swap - no -' | pfexec tee -a /etc/vfstab
pfexec /sbin/swapadd
Update OS and install packages
Important: pkg update creates a new boot environment (BE). Packages installed before the update are NOT carried over to the new BE. Always update first, reboot, then install all packages in one go. You should also remove\destroy the old BE to save disk space
# Update OS (creates new BE, requires reboot)
pfexec pkg update -v
pfexec reboot

# After reboot, delete old BE immediately to save disk space
pfexec beadm destroy -F helios        # Original install BE
# Delete any other old BEs shown by: beadm list

# Verify you're on the latest
uname -v                              # Should show latest helios version

# Install ALL required packages in one command (no new BE created - just additions)
pfexec pkg install -v \
    /developer/build-essential \
    /developer/illumos-tools \
    /developer/pkg-config \
    /library/libxmlsec1 \
    /system/zones/brand/omicron1/tools
Install Rust
Important: Run this as your user, NOT with pfexec. Installing Rust as root puts it in /root/.cargo/ where your user can't find it.
If this happens, move it back: pfexec mv /root/.cargo ~/.cargo && pfexec mv /root/.rustup ~/.rustup && pfexec chown -R $USER:staff ~/.cargo ~/.rustup.
curl --proto '=https' --tlsv1.2 -sSf https://sh.rustup.rs | bash -s -- -y --default-toolchain 1.91.1
source ~/.cargo/env
rustc -V # Should show 1.91.1Note: Omicron pins this version in rust-toolchain.toml. Check the file in the omicron repo if the build fails with toolchain errors, the pinned version may have changed since this guide was written.
Clone and build Omicron
Omicron is the Oxide control plane
git clone https://github.com/oxidecomputer/omicron.git ~/omicron
cd ~/omicron
source env.shInstall prerequisites
# Builder prerequisites (downloads CockroachDB, ClickHouse, dpd, mgd, console assets)
pfexec ./tools/install_builder_prerequisites.sh -y

# Runner prerequisites (installs OPTE xde driver, downloads SoftNPU)
pfexec ./tools/install_runner_prerequisites.sh -y
PATH warnings about cockroach/clickhouse/dpd are normal, they're only needed at runtime.
Important: The prerequisite scripts run as root (pfexec) and create root-owned files in ~/.cargo/registry/ and ~/omicron/out/. Fix ownership before building:
pfexec chown -R $USER:staff ~/.cargo ~/.rustup ~/omicron/target ~/omicron/outConfigure network IPs
Edit smf/sled-agent/non-gimlet/config-rss.toml. The defaults use 192.168.1.x , update ALL IPs to match your network:
# Quick substitution if your network is 192.168.100.x:
sed -i 's/192\.168\.1\./192.168.100./g' smf/sled-agent/non-gimlet/config-rss.toml
Then manually verify and fix these specific values:
| Field | Value |
|---|---|
external_dns_ips | ["192.168.100.70", "192.168.100.71"] |
internal_services_ip_pool_ranges first/last | 192.168.100.70 / 192.168.100.79 |
infra_ip_first / infra_ip_last | 192.168.100.80 / 192.168.100.80 |
routes nexthop | 192.168.100.1 (your gateway) |
addresses | 192.168.100.80/24 |
Build packages
source ~/.cargo/env

# Build the packaging tool (release mode - takes 45-60 min first time depending on your system )
cargo build --release --bin omicron-package

# Create a packaging target for non-simulated dev
./target/release/omicron-package -t default target create -p dev

# Build all packages
./target/release/omicron-package package
The first cargo build --release compiles all Rust binaries. Subsequent builds are faster as they are incremental.
Optional: Reduce replicas to reduce resources
The oxide stack is designed to run to operate on cloud scale on its hardware, this is the exact right solution but is overkill for a lab environment. you don't need to make the below changes but they will make a big impact on available capacity.
By default Omicron creates 9 U.2 vdevs (simulating 9 physical NVMe drives in each sled) and the system scaling\configuration is built around having 9. When i first built this i started with using the default 9 vdevs. Each of these were sparse that would grow with writes. On a 256 GB disk, 9 × 40 GB = 360 GB logical, the vdevs always eventually filled rpool and crash the system even without any workloads running
Reduce redundancy to support 3 vdev deployment
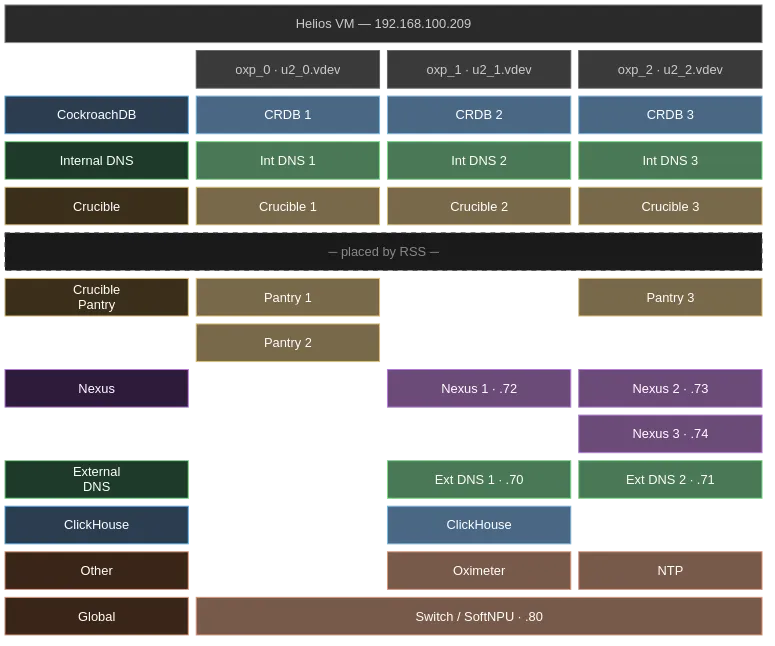
RSS (Rack Setup Service) places zones on U.2 zpools. Each service type gets its own zpool per instance. Sone of these services can share zpools some can’t. The minimum number of zpools is determined by the largest single-type count.
| Service | Default | Recommended Count for Lab | Dedicated zpool per instance? | Purpose |
|---|---|---|---|---|
| CockroachDB | 5 | 3 | Yes | Primary database |
| Internal DNS | 3 | 3 | Yes | Service discovery |
| External DNS | 2 | 2 | Yes | External name resolution |
| Nexus | 3 | 3 | No | API server |
| ClickHouse | 1 | 1 | Yes | Metrics DB (single-node mode) |
| Crucible | 1 per zpool | 3 | Yes (1 per zpool) | Distributed storage |
| Crucible Pantry | 3 | 3 | No (shares) | Disk import/export |
| Oximeter | 1 | 1 | No (shares) | Metrics collector |
| NTP | 1 | 1 | No (shares) | Time sync |
With Cochroach DB (CRDB) reduced to 3, we can reduce the number of zpools to 3. RSS will then place these services where there is capacity.
Example Placement based on my most recent build
Change Cockroach DB instance count
Edit ~/omicron/common/src/policy.rs and change:
pub const COCKROACHDB_REDUNDANCY: usize = 3; // default is 5Then rebuild the binary and packages:
source ~/.cargo/env
cargo build --release --bin omicron-package
./target/release/omicron-package package
Reduce vdev count (required)
Now we have configured our setup to run a reduced service count we can reduce the number of vdev’s to 3 by editing config.toml before creating virtual hardware:
cd ~/omicron
vi smf/sled-agent/non-gimlet/config.toml
Find the vdevs array listing u2_0.vdev through u2_8.vdev. Remove entries u2_3.vdev through u2_8.vdev, keeping only:
u2_0.vdevu2_1.vdevu2_2.vdev
3 vdevs gives 120 GB logical vdev space, leaving ~130 GB headroom on a 256 GB disk.
Create and install
source ~/.cargo/env

# Create virtual disks (vdevs), simulated network (simnets), and SoftNPU zone
pfexec cargo xtask virtual-hardware create \
  --gateway-ip 192.168.100.1 \
  --pxa-start 192.168.100.70 \
  --pxa-end 192.168.100.90 \
  --vdev-size 42949672960

# Install (creates sled-agent SMF service, brings up all zones)
pfexec ./target/release/omicron-package install
Monitor startup (~5-8 minutes)
# Watch zone count (expect ~22 when fully up, with CRDB=3 and 3 vdevs)
watch -n5 'zoneadm list -cnv | grep running | wc -l'

# Watch sled-agent log
tail -F $(svcs -L sled-agent)
Verify
# DNS should resolve Nexus IPs
dig recovery.sys.oxide.test @192.168.100.70 +short

# API should respond
curl -sf http://192.168.100.72/v1/ping
Post-install database fixes
After all zones are running, three database fixes are required before the system is usable. All SQL is executed against CockroachDB inside a zone.
Helper: Running SQL against CockroachDB
Execute SQL
# Find a CRDB zone and execute
CRDB_ZONE=$(zoneadm list -cnv | grep oxz_cockroachdb | head -1 | awk '{print $2}')
ZPATH=$(zoneadm list -cnv | grep "$CRDB_ZONE" | awk '{print $4}')
pfexec cp /tmp/q.sql $ZPATH/root/tmp/q.sql
CRDB_IP=$(pfexec zlogin $CRDB_ZONE ipadm show-addr -p -o ADDR | grep fd00 | head -1 | sed 's|/.*||')
pfexec zlogin $CRDB_ZONE /opt/oxide/cockroachdb/bin/cockroach sql \
  --insecure --host "[$CRDB_IP]:32221" --file /tmp/q.sql
Fix 1: Recovery silo quotas (default is zero)
The recovery silo gets quotas of 0 CPUs, 0 memory, 0 storage. Without this fix, all resource creation fails with 507 Storage Limit Exceeded.
-- Find recovery silo ID
SELECT id, name FROM omicron.public.silo;

-- Set generous quotas
-- (Yes this should be cleaner but my focus is on getting this working)
UPDATE omicron.public.silo_quotas
SET cpus = 9999999999,
    memory_bytes = 999999999999999999,
    storage_bytes = 999999999999999999
WHERE silo_id = '<recovery-silo-uuid>';
Fix 2: Control plane storage buffer (default 250 GB, too large for dev vdevs)
Nexus reserves 250 GB per zpool for control plane use. With smaller vdevs, available space is negative and all disk allocation is rejected.
Formula: available = inv_zpool.total_size - zpool.control_plane_storage_buffer - size_used
UPDATE omicron.public.zpool
SET control_plane_storage_buffer = 5368709120
WHERE time_deleted IS NULL;
Fix 3: Create default IP pool for recovery silo
RSS does not create a user-facing IP pool. Without this, instance creation fails with "Not found: default unicast IPv4 pool for current silo".
Update the query with your IP ranges on the last line!
-- Create user-facing IPv4 pool
INSERT INTO omicron.public.ip_pool (id, name, description, time_created, time_modified, time_deleted, rcgen, ip_version, reservation_type, pool_type)
VALUES (gen_random_uuid(), 'default', 'Default IP pool for instances', now(), now(), NULL, 1, 'v4', 'external_silos', 'unicast');

-- Get the IDs
SELECT id FROM omicron.public.ip_pool WHERE name = 'default';
SELECT id FROM omicron.public.silo WHERE name = 'recovery';

-- Link pool to recovery silo as default
INSERT INTO omicron.public.ip_pool_resource (ip_pool_id, resource_type, resource_id, is_default, pool_type, ip_version)
VALUES ('<pool-uuid>', 'silo', '<recovery-silo-uuid>', true, 'unicast', 'v4');

-- Add IP range
INSERT INTO omicron.public.ip_pool_range (id, time_created, time_modified, time_deleted, first_address, last_address, ip_pool_id, rcgen)
VALUES (gen_random_uuid(), now(), now(), NULL, '192.168.100.81', '192.168.100.90', '<pool-uuid>', 1);
Post Reboot Process
This setup works but is a bit flaky, at the moment it doesn’t survive reboots
Things that have\do occure
- Simnets are gone: virtual network interfaces don't persist
- Encrypted ZFS datasets lose keys: zone paths become invalid
- SoftNPU zone needs to be recreated
- Race condition where
omicron/baselineservice must finish generatinggzonly.txt(~30-60 seconds after boot) and the Sled agent goes to maintenance mode when it can't findnet0(the simnet),
Recovery procedure
cd ~/omicron
source ~/.cargo/env

# Wait for baseline service (MUST be "online" before proceeding)
svcs omicron/baseline

# Uninstall broken state
echo "y" | pfexec ./target/release/omicron-package uninstall

# Destroy and recreate virtual hardware
pfexec cargo xtask virtual-hardware destroy
pfexec cargo xtask virtual-hardware create \
  --gateway-ip 192.168.100.1 \
  --pxa-start 192.168.100.70 \
  --pxa-end 192.168.100.90 \
  --vdev-size 42949672960

# Reinstall
pfexec ./target/release/omicron-package install

# Monitor (takes ~5-8 minutes for all 22 zones)
watch -n5 'zoneadm list -cnv | grep running | wc -l'